The products we used:
The Finisher
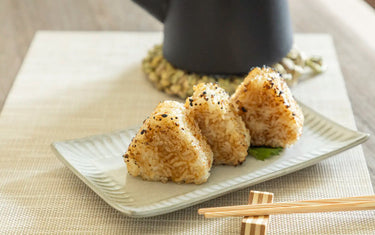
Yaki onigiri is a normal onigiri that is roasted and then coated with a soy sauce mixture. Yaki onigiri is usually eaten at barbecues or while camping, typically as a finisher after eating the rest of the meal (meat and vegetables) and the embers of the grill are starting to die down.
If you’re on the road to rice nirvana, then you’ve come to the right place. Continue reading to learn how to make yaki onigiri to satisfy your hunger for carbohydrate enlightenment.
Making Onigiri


First, you need to make the onigiri. We’ve written articles in the past teaching how to make onigiri by hand and with a mold. For this session, we decided to use a mold by Akebono. It allows us to make six onigiri at once, approximately 6 cm wide each, which is perfect for those times when we have our friends and family over for a feast.
Place cooked rice in the mold

After you cook your rice (either in a typical rice cooker or in a traditional cast iron rice cooker) and optionally finished it in an ohitsu (for when you want to maximize your handsomeness), place it in the mold.
Usually, onigiri doesn’t have any kind of filling. It’s usually served as a finisher for the end of a nice barbecue where the only other carbohydrate eaten is the popular Japanese pumpkin (kabocha squash).
Don’t add salt!
If you’ve mastered the regular onigiri already, you probably douse the onigiri with salt water to enhance its flavor. Later we are going to coat the yaki onigiri with a considerable amount of soy sauce and mirin, so don’t add salt to the onigiri like you usually would.
Compact the rice and remove onigiri


To complete the molding of the rice, use the rice mold top to compact the rice gently. You don’t want to smash the onigiri, just lightly compact it to help the rice hold its shape. Once compacted, push them out of the mold.
With that, your onigiri is finished and ready to be roasted.
Roasting the Onigiri
Roasting onigiri may sound a bit challenging. Isn’t rice, especially that delicious medium-grain sushi rice, quite sticky? Yes, it’s quite sticky, but it’s also a fairly easy challenge to overcome.
While it’s possible to make yaki onigiri in the oven, typically it’s grilled on the same grill used to make yakiniku, so for this article we used an indoor grill mesh by the fine folks at Mannen. Whether you’re using the Mannen or your own outdoor grill, the same principles apply.
Grease the grill mesh

Before you start roasting, make sure that the mesh is well greased. If you’ve just finished grilling the last of the pork or chicken, you probably already have this step taken care of.
Place onigiri on grill at low heat

After greasing the mesh, the key to preventing the rice from sticking is to roast it at low heat. Typically, you should plan to keep the onigiri on the grill for about 7-8 minutes at low heat.
At the end of a nice barbecue, your grill may have a bit of charcoal left over letting out its last bit of heat. The perfect time to drop some carb bombs on the grill!
Flip

While the onigiri is roasting, slowly peel and rotate it to help it roast evenly and prevent sticking. Be careful not to do it too soon, though. This step will take a bit of trial and error to get right. Globalkitchen Japan does not guarantee that the road to rice nirvana is without a few bumps and potholes.
After you’ve roasted one side, flip the onigiri over and repeat the process again on the other side.
Add Soy Sauce Mixture


Now it’s time for the sauce. The sauce is very simple: soy sauce and mirin. Mirin is typically sweet and does a nice job of balancing our the bitterness of the grill and salt of the soy sauce. The typical ratio of soy-sauce-to-mirin should be around 2:1 or 3:1. If you want it to be a bit sweeter, then for every 2 tablespoons of soy sauce, mix 1 tablespoon of mirin. If you want your yaki onigiri to be saltier, then make it 3 tablespoons of soy sauce to 1 tablespoon of mirin.
Once your onigiri is crispy and well roasted, it’s time to add the sauce. You can either take the rice off the grill and take your time applying the soy sauce, or you can apply it directly while it's still on the grill using a brush.
At this point, you can also stand the onigiri up vertically to roast all sides and apply the soy sauce.
After applying the soy sauce, continue grilling the rice until the soy sauce dries. After it dries, repeat the process again a second and third time to maximize the rich flavor of the roasted soy sauce.
Serve and Enjoy

Once your onigiri has a rich coating of soy sauce, its ready to eat. Congratulations, you now have yaki onigiri!
Rice Nirvana draws near… I can smell it.
While yaki onigiri is most often eaten at barbecues or while out camping, there’s no rule that says you can’t enjoy a nice yaki onigiri right at home for dinner. A yaki onigiri stuffed with melted cheese and topped with an egg can make a delicious main dish at dinner. Any of your favorite proteins will pair well with yaki onigiri. The choice is up to you. You’re the captain of this ship to rice nirvana.


