


The products we used:


Why Sift Flour?

I’m going to let you in on a little secret: I like to cut corners when I cook. Sometimes I don’t salt my meats or bring them to room temperature before cooking! I’m only human, forgive me.
As a professional cutter of corners, I often question the need for some of the complexity that I see in cooking. One example is sifting flour. Do I really need a special tool–yet another thing I need to find space for in my crowded kitchen–if I’m just getting started with baking? Or can I get away without it? What are the tradeoffs?
There are two primary reasons to sift flour: to make your baking lighter and fluffier, and to get all your ingredients mixed evenly.
When you sift flour, it “aerates” the flour. You know how fresh snow is light and fluffy, but “packed” snow is hard and slippery? That’s because the new snow has extra air between the snow flakes. When you make your snow angels, you push the snow down and the air out.
What’s the use of the extra air in sifted flour? It makes mixing dry ingredients easier and faster, and leads to more even mixtures.
Baked goods like cookies are also quite delicate. After adding wet ingredients, it’s important not to over-mix the dough. Otherwise, instead of having a light, fluffy cookie, you’ll have a denser, firmer cookie. Sifting the flour shortens the amount of time necessary to mix the dough.
That’s especially true when you consider clumps. Flour often has small balls of flour that resist getting mixed into the rest of the batter. Those clumps end up not getting wet, and not mixing with the other ingredients, leading to small pockets of flour in your final product. I don’t think I need to tell you that plain flour is not very tasty on its own.
Of course, you can simply do some extra mixing to get those clumps mixed in, but you risk over-mixing. You could try manually finding and crushing the clumps, but that’s a lot of work and you’re not guaranteed to find all of them.
So by sifting, you get an even distribution of ingredients with less mixing and no clumping. Perfect cookies and cakes with one step. Another bonus: lighter batters are easier to press with a cookie press–allowing more control over cookie placement and decorative possibilities.
Tips for Using a Flour Sifter

Using a flour sifter doesn’t have to be a messy ordeal if you keep a few pointers in mind. Here’s how to do it right:
- Work Over a Bowl or Paper: Place a mixing bowl or a sheet of parchment paper under your sifter to catch the flour and avoid a powdery countertop disaster.
- Don’t Overfill: Add flour to the sifter in small batches. Overloading it can clog the mesh and make the process harder than it needs to be.
- Tap or Crank Gently: Whether you’re using a hand-crank sifter or a simple mesh sieve, use a steady, gentle motion. Tapping the side of a sieve or turning the crank slowly prevents flour from flying everywhere.
- Check the Mesh: After sifting, inspect the sifter for any stubborn clumps. If you find some, toss them out—they’re not worth forcing through.
- Clean Immediately: Flour can stick and harden in the mesh if left too long. Rinse your sifter right after use to keep it in top shape.
With these tips, sifting becomes a breeze, and you’ll notice the difference in your dough or batter’s texture.
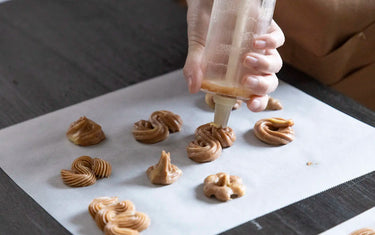
How to Use a Cookie Press

Since you sifted your flour and mixed the ingredients quickly, your dough should be nice and soft. Now your delicious cookie dough can be shaped and placed on the cookie sheet easily with a cookie press. Using a press is easy.
Prep Your Dough

Most cookie presses work best with a soft, pliable dough—not too sticky or too firm. Follow your recipe, and chill the dough slightly if needed for easier handling.
Load the Dough

Fill the cookie press’s barrel or chamber with dough, pressing it down to remove air pockets. Don’t overstuff it, or it might jam.
Press or Extrude

Position the press over a baking sheet (ungreased, unless your recipe says otherwise), and press the trigger or handle. For electric models, follow the timing instructions—usually a few seconds per cookie.
Bake and Cool

Once your cookies are shaped, pop them in the oven according to your recipe. Let them cool on a rack to crisp up.
Pro tip: Practice on a plate first to get the hang of the press’s pressure and speed. It’s all about finding your rhythm!
What You Can Make with a Cookie Press
Sometimes, a cookie is just a cookie. Especially when you’re starting out, you might not want to have an extra kitchen utensil to clean and store.
Other times, you want your cookies to take an event to the next level. There are a variety of ways you can make use of your cookie press to elevate both your cookies and other cooking to the next level.
- Classic Spritz Cookies: These buttery, melt-in-your-mouth treats are the cookie press’s signature. Play with vanilla, almond, or citrus extracts for variety.
- Savory Bites: Swap sweet dough for a cheesy or herbed mix to create crackers or appetizer nibbles. Think parmesan-rosemary or cheddar-chive combos.
- Decorative Shapes: Use different discs to craft holiday-themed goodies—snowflakes for winter, pumpkins for fall, or flowers for spring.
- Filled Treats: Some advanced cookie presss let you add fillings like jam or chocolate. Imagine a raspberry swirl cookie or a chocolate-center star!
- Gluten-Free Goodies: Experiment with almond or rice flour doughs to cater to dietary needs without sacrificing shape or taste.
The beauty of a cookie press is its consistency—every piece looks bakery-perfect with minimal effort. Mix up flavors, colors, and toppings to keep things exciting.
More Baking
If you like to take your baking to the next level, you might be interested in learning about making Halloween cookies. If you’re interested in more Japanese-style baked pastries, you could using your cookie press to fill your lucky taiyaki with some delicious ingredients besides anko.
